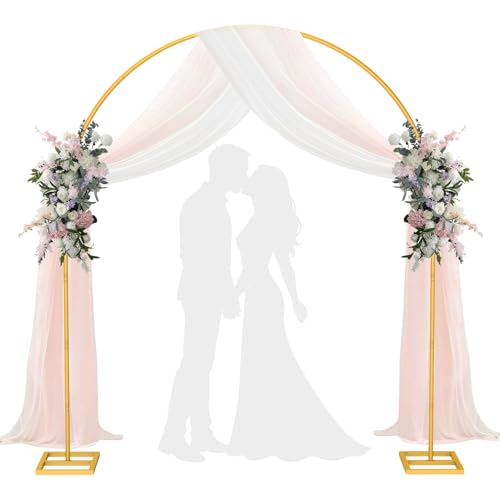
The Ultimate Guide to Your DIY Wedding Arch
"Create a breathtaking focal point for your ceremony without the luxury price tag. Your step-by-step guide to building and styling a dream arch."
The wedding arch is the undisputed star of your ceremony backdrop. It frames the moment you say "I do," creating a beautiful focal point for you, your partner, and every photograph taken. While a florist-designed arch can be a significant investment, taking the DIY route is a rewarding and surprisingly achievable project. This guide will walk you through everything you need to know to create a stunning, professional-looking arch on your own terms, giving you complete creative control and a huge sense of accomplishment.
1. Plan: Frame Styles & Materials
The foundation of your DIY arch is the frame itself. Your choice here dictates the entire style of the piece and the difficulty of the build. Choosing the right frame is the first and most important step.
The Classic Wooden Arbor
This is the most versatile and popular choice for DIYers. Often available as a simple kit, a wooden arbor brings a warm, rustic, or garden feel. An entry-level wooden frame is typically made of pine or fir, while a mid-range or premium option might use cedar or feature more intricate joinery. It's sturdy and easy to decorate with draping fabric or floral garlands.
The Modern Metal Arch
For a clean, contemporary, or minimalist wedding, a metal arch is the perfect choice. These frames, often in a circle, hexagon, or geometric design, are sleek and elegant. A budget-friendly metal arch is typically a simple round or rectangular design. A high-end version might feature a more complex shape like a hexagon or an intricate gold-painted frame. They are lightweight and easy to assemble.
Making the Choice: A wooden arbor is more forgiving for beginners because you can easily staple or zip-tie decorations to it. A metal arch offers a sleek look but may require more careful attachment methods to avoid scratching the finish. Consider the overall vibe of your wedding venue to decide which frame style will harmonize best with the surroundings.
2. Design: Choosing Your Floral Style
Once you have your frame, the fun begins. The decorations you choose will define the arch's personality. The two primary choices are fresh versus artificial flowers, each with its own set of pros and cons for a DIY project.
Fresh vs. Artificial Florals
For a DIY arch, wedding floral arrangements using high-quality silk flowers are the most recommended and practical option. They are durable, won't wilt, and you can arrange them days in advance. If you dream of real flowers, be prepared for the extra work: you'll need to keep stems hydrated with water tubes or floral foam, which adds weight and complexity. For most DIYers, beautiful artificial blooms or dried pampas grass are the smart, stress-free choice.
The goal is to create a beautiful ceremony backdrop that feels authentic to you. Don't be afraid to mix textures and add non-floral elements like ribbon, macrame, or lanterns to make it unique.
💡 Beginner's Tip: Start with a pre-made floral garland or two. A high-quality artificial garland can be your base, and you can then weave in extra stems of flowers and greenery to add fullness and color. This method saves hours of work and ensures a beautiful, balanced result.
3. Build: A Step-by-Step DIY Guide
Ready to get started? This simple, tested approach will help you build a beautiful, professional-looking arch without the guesswork. Before you begin, gather all your materials in a large, well-ventilated space.
Tools & Materials You'll Need:
- Your chosen arch frame (wood or metal)
- Floral wire (green, 22-gauge is a good all-purpose weight)
- Clear zip ties (various sizes, from small to heavy-duty)
- Wire cutters and scissors
- Greenery garlands (2-4, depending on the arch size)
- Focal flower bushes or individual stems
- Optional: Fabric for draping, ribbon, floral tape
The "S" Curve Method
This is the secret to a natural, organic look. Instead of covering the whole frame, you'll create a graceful "S" shape with your greenery.
- Start at the base: Use heavy-duty zip ties to attach the thickest end of a greenery garland to one of the arch's legs. Make sure it's secure.
- Create the curve: Guide the garland up and across the frame in a soft "S" shape. Secure it every few inches with floral wire or small zip ties, keeping the ties as inconspicuous as possible.
- Layer in flowers: Now, take your focal flowers (like roses or peonies) and weave them into the greenery. Vary the depth—some flowers pushed forward, some nestled deeper—to create a 3D effect.
- Hide the mechanics: Use leftover leaves, floral tape, or ribbon to cover any visible wire or zip ties. This final step is what makes it look professionally finished.
Pro's Tip for a Balanced Look: A popular and very effective design is to concentrate the florals on one side of the arch in a cascading style. This is called an asymmetrical design. It uses fewer flowers, is faster to create, and is incredibly photogenic.
If you are looking for more wedding flower ideas, consider incorporating elements that match your theme, like pampas grass for a boho wedding or vines for a garden feel.
4. Style: Unleash Your Creativity
Your arch is a blank canvas. Beyond the classic floral cascade, consider these unique styling ideas to make your DIY wedding truly memorable.
- Fabric Draping: Drape soft, flowing fabrics like chiffon or tulle across a simple wooden or metal frame. This adds a romantic, ethereal quality and can be more budget-friendly than an all-floral design.
- Macrame or Woven Backdrops: For a bohemian or outdoor feel, a handmade macrame backdrop adds beautiful texture and a unique handmade touch. This can be a stunning stand-alone piece or a layered backdrop.
- Ribbon & Streamers: Attach long, flowing ribbons in your wedding colors to the arch, letting them catch the breeze. This is a simple, low-cost way to add color and movement to your ceremony space.
- Greenery-Focused: Let the greenery be the star. Use a variety of ferns, eucalyptus, and vines to create a lush, garden-inspired arch. This look is especially stunning in an outdoor venue.
5. Install: Transport & Setup Tips
You've built a masterpiece—now you need to get it to the venue in one piece! Transportation and setup are crucial final steps.
Packing & Transport
Most arch frames disassemble into 2-4 pieces, making them easy to transport in an SUV or large trunk. The key is to keep the decorated sections together. If you have floral sprays attached to the top piece, use large plastic bags or tissue paper to protect the blooms and prevent tangling during the drive.
Assembly at the Venue
Wait until you are at the venue to assemble the full arch. It's much easier to move and position a bare frame. Once assembled, have a helper hold it upright while you attach any large, delicate floral pieces. Ensure the legs are stable on the ground and use sandbags or stakes if your venue is prone to wind.