Wedding Emergency Kits: Your Day-Of Survival Guide
"Because even the most carefully planned wedding day can throw a curveball. Be ready for anything."
Your wedding day is a whirlwind of emotion, activity, and carefully choreographed moments. You have spent months—perhaps years—planning every detail, from the floral arrangements to the reception decor. But no matter how meticulously you plan, unexpected things happen. A strap breaks. A lipstick smudges. A headache strikes right before your first dance. This is exactly why a wedding emergency kit is one of the most important—and most overlooked—items you can prepare.
A well-stocked wedding emergency kit is not about being pessimistic. It is about being prepared, so you can handle any minor hiccup with grace and get back to enjoying the moment. Think of it as your personal safety net—a compact collection of items that can save your day, your photos, and your sanity. Whether you are planning a small intimate wedding or a grand ballroom celebration, this guide will walk you through exactly what to pack, how to assemble your kit, and who should be responsible for it.
Why Every Bride Needs an Emergency Kit
Weddings are long days. From early morning hair and makeup sessions to late-night dancing, you and your bridal party will be on your feet for twelve hours or more. In that time, countless small things can go wrong. A button pops off the groom's shirt. A bridesmaid's heel snaps. A sudden rain shower threatens an outdoor ceremony. The ribbon on your bouquet comes loose.
None of these situations are catastrophic on their own, but if you are unprepared, they can cause unnecessary stress and even derail your timeline. Having a wedding emergency kit on hand means you or your maid of honor can solve these problems in seconds rather than scrambling to find a pharmacy or borrowing supplies from a venue that may not have what you need.
💡 Real Talk from Real Weddings: In a survey of over 500 brides, the most commonly reported wedding day emergencies were: a broken dress strap (28%), a makeup or lipstick mishap (22%), a torn hem or fallen button (18%), a headache or upset stomach (15%), and a spot or stain on the wedding dress (12%). Every single one of these can be handled with a basic emergency kit. The 5% who reported a "major" emergency—a lost ring, a vendor no-show, a medical issue—wished they had been better prepared too.
The peace of mind alone is worth it. When you know that your maid of honor is holding a kit with everything you might need, you can relax and focus on what actually matters: marrying the love of your life. If you are still in the early stages of planning, our DIY wedding guide offers more tips on keeping things manageable and stress-free.
The Six Essential Categories
When building your kit, think in terms of categories. This ensures you do not forget anything important and helps you organize your items logically. We recommend dividing your kit into six distinct categories, each addressing a different type of potential issue.
🧵 Sewing & Repair
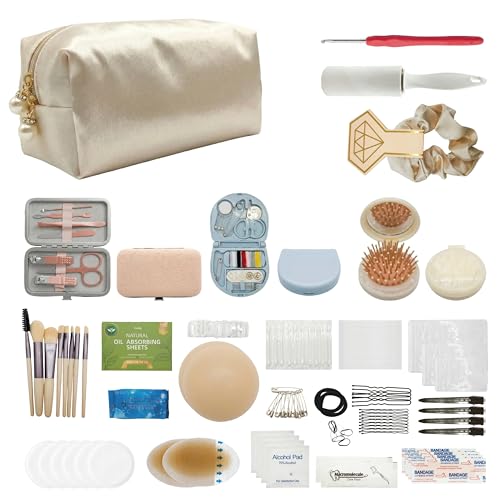
- Small sewing kit with white, black, and ivory thread
- Safety pins in multiple sizes (at least 20 assorted)
- Fabric tape (double-sided and single-sided)
- Mini scissors with sharp blades
- Clear nail polish (stops runs in stockings and secures loose threads)
- Fray Check or clear glue for fabric
- Lint roller (travel size)
💄 Makeup & Touch-Ups
- Your exact lipstick shade (plus a backup)
- Blotting papers (oil-absorbing sheets)
- Pressed powder and a small brush
- Waterproof mascara and eyeliner
- Cotton swabs and cotton pads
- Makeup remover wipes (travel size)
- Small mirror with a stand
- Tweezers and nail clippers
🩹 First Aid & Health
- Adhesive bandages in assorted sizes
- Antiseptic wipes and antibiotic ointment
- Pain reliever (ibuprofen or acetaminophen)
- Antacid tablets
- Allergy medication (non-drowsy)
- Blister cushions or moleskin
- Any prescription medications (in original containers)
- Digital thermometer (compact)
🧴 Personal Care & Hygiene
- Travel-size deodorant
- Travel-size mouthwash and breath mints
- Toothbrush and toothpaste (travel size)
- Hand sanitizer (travel size)
- Feminine hygiene products
- Body powder or anti-chafe balm
- Tissues (pocket packs)
- Contact lens solution and a spare lens case
🧹 Stain Removal & Cleaning
- Stain remover pen (Tide to Go or similar)
- Shout wipes or stain removal wipes
- White chalk (absorbs grease stains on fabric)
- Club soda or sparkling water (small bottle)
- Baby wipes (gentle on fabrics and skin)
- Microfiber cloth (for rings and jewelry)
📋 Miscellaneous & Extras
- Phone charger and portable power bank
- Cash in small bills (for tips or emergencies)
- Copies of vendor contracts and contact list
- Mini umbrella (white or clear)
- Foldable flats or flip-flops (for tired feet)
- Snacks (granola bars, nuts, or crackers)
- Water bottle (reusable, with a straw)
- Notepad and pen (for last-minute notes)
Pro Tip: Pack your kit in a clear, zippered bag or a small compartmentalized organizer. Clear bags make it easy to see what is inside without digging, and compartmentalization keeps small items like safety pins from spilling everywhere. Many brides use a hanging toiletry bag with multiple pockets—it can be hung on a door or chair for easy access.
Buy vs. Build: Which Is Right for You?
When it comes to wedding emergency kits, you have two main options: purchase a pre-assembled kit or build your own from scratch. Both approaches have merit, and the right choice depends on your personality, your timeline, and your budget consciousness.
Pre-Made Wedding Emergency Kits
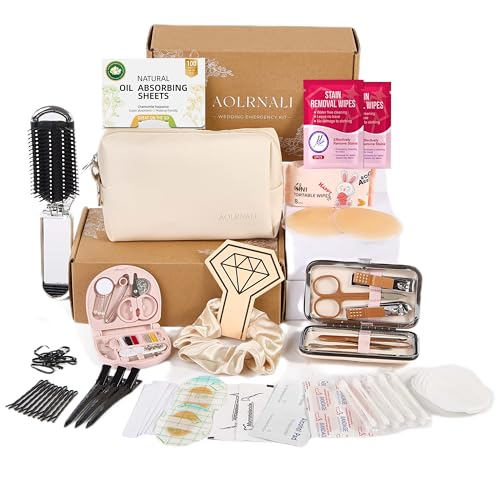
Pre-made kits are widely available online and in bridal boutiques. They come in a variety of sizes, from compact "day-of" pouches to comprehensive multi-compartment organizers. Many are packaged beautifully, often in white or ivory cases with gold accents, making them a lovely gift for a bride-to-be or a thoughtful addition to a bridesmaid proposal box.
Advantages of pre-made kits:
- Convenience: Everything is already assembled and ready to use. No hunting down individual items.
- Curated selection: Reputable kit makers have done the research and included the most commonly needed items.
- Beautiful packaging: Many kits are designed to look elegant and photo-worthy, which matters for those getting-ready photos.
- Gift-ready: A pre-made kit makes an excellent bridal shower or engagement gift.
Disadvantages of pre-made kits:
- Generic contents: You may not need everything in the kit, and you will likely need to add personal items anyway.
- Quality variance: Entry-level kits may include low-quality items that are not up to the task. Mid-range and premium kits tend to have better-quality components, but you pay for that convenience.
- Missing your specific favorites: A pre-made kit will not include your exact lipstick shade or your preferred brand of pain reliever.
DIY Wedding Emergency Kits
Building your own kit gives you total control. You can customize every item to your specific needs and preferences, and you can skip things you know you will never use. This approach is also generally more budget-friendly if you already have many of the items on hand.
Advantages of DIY kits:
- Fully personalized: Include exactly what you need and nothing you do not.
- Cost control: Use items from your existing makeup bag and medicine cabinet.
- Better quality where it matters: Splurge on a high-quality stain remover pen and skip the cheap sewing kit in favor of one you already own.
- Meaningful gift: A thoughtfully assembled DIY kit feels more personal than a store-bought one.
Disadvantages of DIY kits:
- Time investment: You need to source and organize every item yourself.
- Risk of forgetting something: Without a checklist, it is easy to overlook important items.
- Packaging challenges: Finding the right bag or organizer takes some effort.
💡 The Hybrid Approach (Recommended): Start with a mid-range or premium pre-made kit, then add your personal essentials. This gives you the convenience of a curated base plus the customization of a DIY kit. Swap out the generic lip balm for your favorite, add your specific medications, and include a few extra safety pins in your preferred sizes. For brides who love DIY projects, our DIY wedding guide has more inspiration for personalized touches.
Who Should Hold the Kit?
The bride should never be the one responsible for carrying or locating the emergency kit. On your wedding day, you will be pulled in a dozen directions at once—photos, greetings, last-minute questions. The kit needs to be in the hands of someone who is organized, nearby, and not afraid to take charge when needed.
Your maid of honor is the natural choice. She is already responsible for a long list of maid of honor duties, and holding the emergency kit is one of the most important. Brief her on what is inside, where it is at all times, and encourage her to do a quick inventory the night before the wedding. She should also know where the backup kit is located (see below).
Consider having two kits: one for the getting-ready suite and one for the ceremony or reception venue. The getting-ready kit can be larger and more comprehensive, while the ceremony kit should be compact and portable—just the essentials for a quick touch-up or repair.
If you have a wedding planner or day-of coordinator, ask if they carry their own emergency kit. Many experienced planners do, and they are often stocked with professional-grade supplies. However, do not rely solely on your planner. Your kit should contain personal items that a generic planner kit would not include, like your specific medications and makeup.
How to Build a DIY Emergency Kit
Building your own kit is straightforward if you follow a system. Here is a step-by-step approach that ensures you do not miss anything important.
Step 1: Choose Your Container
Your container should be portable, sturdy, and easy to organize. Good options include:
- A hanging toiletry bag with multiple zippered compartments. This is the most popular choice because it can be hung on a door or chair and keeps items visible and accessible.
- A clear plastic organizer with dividers. Ideal if you want to see everything at a glance.
- A small duffel bag or tote with inner pockets. Good if your kit is larger and includes bulkier items like a change of shoes or a mini umbrella.
- A decorative box or basket for the getting-ready suite. Less portable, but beautiful for photos.
Step 2: Gather Your Items by Category
Use the six-category checklist above as your master list. Go through each category and pull items from your existing supplies. You will be surprised how many things you already own. For items you need to purchase, make a shopping list and buy them in a single trip or online order to save time.
Step 3: Test and Quality-Check
Do not assume that the stain remover pen from three years ago still works. Test every product before packing it. Check that your sewing kit has threaded needles and sharp scissors. Make sure your pain reliever is not expired. A kit full of expired or broken items is worse than no kit at all.
Step 4: Organize and Label
Use small clear pouches or ziplock bags to group items by category. Label each pouch with a permanent marker. This makes it easy for your maid of honor to find what she needs quickly, even under pressure. For example, label one pouch "Sewing," another "First Aid," and another "Makeup Touch-Ups."
Step 5: Create an Inventory List
Type or write a simple inventory list and tape it to the inside lid of your kit (or keep it in the front pocket). This serves two purposes: it helps you remember what is inside without opening every pouch, and it makes it easy to restock after the wedding if you plan to keep the kit for future use (or pass it on to a friend).
Pro Tip for Brides on a Budget: Many of the items in a wedding emergency kit are things you probably already have at home. Do not buy a full pre-made kit if you only need a few items. Instead, invest in the items you are missing—typically a good stain remover pen, a comprehensive sewing kit, and a quality set of safety pins. The rest can come from your existing supplies. Check our wedding planning resources for more money-saving strategies.
When to Prepare and Where to Store It
Timing matters. You do not want to be assembling your emergency kit the night before the wedding when you should be resting. Aim to have your kit fully assembled and packed at least one week before the wedding. This gives you time to notice anything missing and add it before the big day.
One week before: Assemble the kit, test all products, and label everything. Brief your maid of honor on the contents and where the kit will be stored.
The night before: Do a final inventory check. Make sure all medications are packed, your phone charger is working, and you have cash in small bills. Place the kit in your getting-ready bag so it is the first thing you see when you arrive at the venue.
The morning of: Hand the kit to your maid of honor. Confirm that she knows where the backup kit is (if you have one) and that she has your vendor contact list. This is also a good time to review the wedding photo checklist to ensure nothing is missed during the getting-ready photos.
Where to store it: Keep the main kit in the getting-ready suite, ideally in a visible spot like on a vanity table or hanging on a door. Keep the backup ceremony kit with your maid of honor or a trusted family member who will be seated near the front during the ceremony.
Wedding Emergency Kit FAQs
Preparing a wedding emergency kit is one of those tasks that feels small but pays enormous dividends. It is a gesture of self-care and foresight—a way of saying that you deserve to enjoy your day without the nagging worry of what might go wrong. Assemble your kit, hand it to someone you trust, and then let it go. Your only job on your wedding day is to be present, to soak in every moment, and to celebrate the beginning of your marriage.
If you are still in the planning phase and want to make sure every detail is covered, explore our wedding planning checklist for a comprehensive timeline. And for more ideas on making your day run smoothly, from rehearsal dinner planning to reception logistics, you will find a wealth of resources right here on WeddingClever.